
Hyprland Post Install Setup & Keybinds
Ce contenu n’est pas encore disponible dans votre langue.
Why use Hyprland?
Section titled “Why use Hyprland?”Hyprland is a beautiful dynamic tiling manager that offers a variety of layouts and advanced compositor functionality such as VRR, tearing, and HDR. The CachyOS dots for Hyprland are setup with general defaults that should be completely usable out of the box, with applications that follow the general system theme.
Dotfiles maintained by Jinra
For Noctalia related issues please take a look at the Noctalia docs.
Post Setup Tasks
Section titled “Post Setup Tasks”You will want to configure a few user-specific things after setup. For additional settings, please refer to the Hyprland wiki https://wiki.hypr.land/Configuring/Start/
Location ~/.config/hypr/config
Section titled “Location ~/.config/hypr/config”monitors.luawill setup your monitors. (see more at https://wiki.hypr.land/Configuring/Basics/Monitors/)outputshould be your monitor id; you can runhyprctl monitorsto get this id (e.g.DP-1).modeshould be in a format such as1920x1080@60(horizontal x vertical @ refresh rate).scaleYou will most likely want1, but may want this value higher for higher resolution monitors.- You will need to reboot after the first adjustment, but future adjustments should be reflected live.
variables.lua- Add your monitor assignments here. your
PRIMARY_MONITORandMONITOR1should generally be the same monitor. You can remove/addMONITOR#variables as needed. - Define your number of workspaces per monitor. Do not exceed 10.
- Add your monitor assignments here. your
input.luaYou can define your various hypr input settings here. You’ll probably want to adjust thesensitivity.binds.luaReview this file to see all the keybinds for these dots. You can also check out the general overview below.windowrules.luaIf you find yourself wondering why certain windows have certain behaviors check this file; you can also add/remove rules as you see fit.workspaces.luaAdd various workspace settings here. It’s recommended to add 3 workspaces per monitor (as shown in the examples) plus the gaming workspace to the primary monitor.environment.luais used for setting hypr or user specific environmental variables. Not required to adjust if you’re using UWSM, and it’s more preferable to add these to the UWSM env file instead (see below).
Location ~/.config/uwsm
Section titled “Location ~/.config/uwsm”envis a file used for defining global variables, you can use this for general variables that need to be assigned for your specific user account (Examples:HYPRCURSOR_THEME,XCURSOR_THEME,QT_QPA_PLATFORM, etc.)
Location ~/.config/noctalia (V5 only; V4 will have files here, but you do not need to touch them as they can be configured through Noctalia settings)
Section titled “Location ~/.config/noctalia (V5 only; V4 will have files here, but you do not need to touch them as they can be configured through Noctalia settings)”config.tomlthis is where default configuration for cachyos-hypr-noctalia lives. If you’re wondering why the defaults differ from a vanilla noctalia v5 installation, this is why. You shouldn’t have to touch anything in this file.
Location noctalia settings (Super + Z)
Section titled “Location noctalia settings (Super + Z)”- You can edit Noctalia settings here. It’s recommended to go to the templates section and turn on any color templates for any apps you may use.
- Also check out the plugins store for useful official and community plugins.
Keybinds
Section titled “Keybinds”Most of the key combinations require the use of the mod key which in our case is the Windows/Command key (referenced as SUPER), you can change it in binds.lua.
Window Management
Section titled “Window Management”| Description | Key |
|---|---|
| Force close app/window (hold combo and click) | |
| Close focused window/app | |
| Toggle floating/tiled | |
| Maximize focused window | |
| Fullscreen focused window | |
| Toggle split direction | |
| Focus left | |
| Focus right | |
| Focus up | |
| Focus down | |
| Switch window focus on workspace | |
| Open window switcher | |
| Move focused window to monitor | |
| Move focused window to workspace | |
| Move focused window to special workspace | |
| Move focused window right | |
| Move focused window left | |
| Move focused window up | |
| Move focused window down | |
| Move focused window to next workspace | |
| Move focused window to previous workspace | |
| Move focused window to previous workspace (mouse) | |
| Move focused window to next workspace (mouse) | |
| Move focused window to next monitor | |
| Move focused window to previous monitor | |
| Move window (mouse) | |
| Reize window (mouse) |
Launcher
Section titled “Launcher”| Description | Key |
|---|---|
| Open Terminal | |
| Open File Manager | |
| Open Editor | |
| Open Calculator | |
| Open Browser | |
| Open System Monitor (btop) | |
| Toggle Noctalia Settings | |
| Toggle Control Center | |
| Toggle App Launcher | |
| Open Emoji Launcher | |
| Lock screen | |
| Toggle session menu |
Hardware Controls
Section titled “Hardware Controls”| Description | Key |
|---|---|
| Raise Volume | |
| Lower Volume | |
| Mute Audio Output | |
| Mute Microphone Input | |
| Play/Pause Media | |
| Next Media Track | |
| Previous Media Track | |
| Increase Screen Brightness | |
| Decrease Screen Brightness |
Utilities
Section titled “Utilities”| Description | Key |
|---|---|
| Color Picker | |
| Screen Capture & Annotate | |
| Screen Capture Window & Annotate (v4) | |
| Screen Capture Monitor & Annotate (v5) | |
| Toggle Screen Recorder (v4 only) | |
| Toggle Wallpaper Menu | |
| Open Clipboard History | |
| Toggle Notification History |
Workspaces & Monitors
Section titled “Workspaces & Monitors”| Description | Key |
|---|---|
| Switch to workspace [1-10] | |
| Move window to workspace [1-10] (follow) | |
| Move window to workspace [1-10] (don’t follow) | |
| Focus workspace | |
| Focus next workspace | |
| Focus previous workspace | |
| Focus first empty workspace | |
| Focus next workspace (mouse) | |
| Focus previous workspace (mouse) | |
| Focus next monitor (mouse) | |
| Focus previous monitor (mouse) | |
| Toggle special workspace (scratchpad) |
Migrating from another DE/WM
Section titled “Migrating from another DE/WM”If you already have another DE/WM installed, you can migrate to this dots with the instructions below.
Make sure to replace the variables in angle brackets (<>) below including the angle brackets themselves.
- Run
sudo pacman -S cachyos-hypr-noctalia. If you run into a package conflict with another-settingspackage (such ascachyos-kde-settings), you can delete the conflicting package as these packages do not affect current users. - To create a new user run
sudo useradd -m <new_user> -s /bin/fish. You can also use another shell if you prefer (i.e. /bin/zsh). - Run
sudo passwd <new_user>to set a password for the account.- If you really want to use the same account (highly discouraged), instead copy the dots over to the user folder
cp -r /etc/skel/. ~(make sure to create a backup/snapshot first!)
- If you really want to use the same account (highly discouraged), instead copy the dots over to the user folder
- Optionally install
noctalia-greeterorsddmas your display manager.noctalia-greeterintegrates better with Noctalia, but setup is slightly more complicated.- To enable sddm as your display manager, install it with
sudo pacman -Syu sddm, then runsystemctl disable display-managerandsystemctl enable sddm. - To install Noctalia Greeter, run
sudo pacman -Syu noctalia-greeter, and follow the “Setting up greetd” section of the linked doc. Afterwards, runsystemctl disable display-managerandsystemctl enable greetd.
- To enable sddm as your display manager, install it with
- Reboot and select the Hyprland (UWSM) session from your display manager.
- If the shell fails to load, try rebooting once more.
- Log in and follow the Post Setup Tasks.
Migrating from v4 dots to V5 / Updating your dots
Section titled “Migrating from v4 dots to V5 / Updating your dots”If you’re currently using cachyos-hypr-noctalia with Noctalia v4 and have updated from package version 1.0 to a newer version, or want to update your dots, follow the instructions below. See full change logs in the release to determine if you should update your dots. https://github.com/CachyOS/cachyos-hypr-noctalia/releases
Hypr updates
Section titled “Hypr updates”- Install
meldif you don’t have it (pacman -Q meldto check if you have it). - Run
meld /etc/skel/.config/hypr ~/.config/hypr. - From meld you will see an overview of all the files with changes. Blue files have changes, while green files are net new.
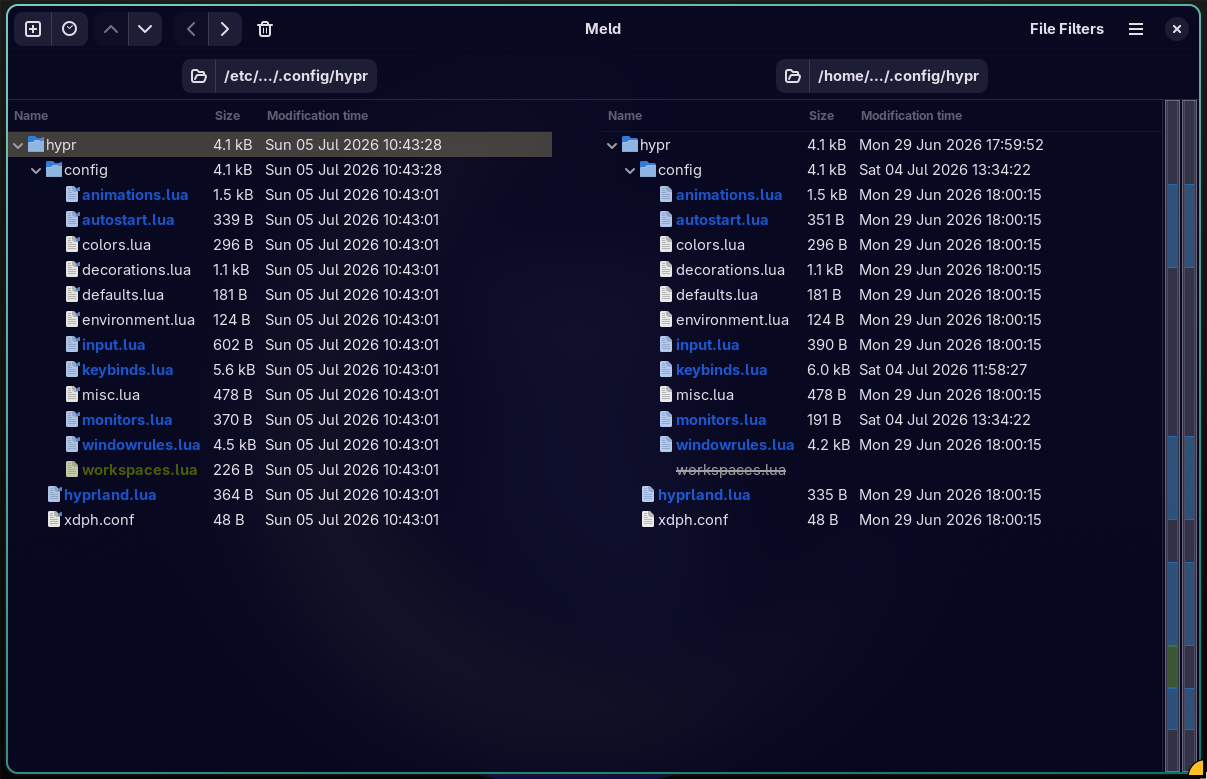
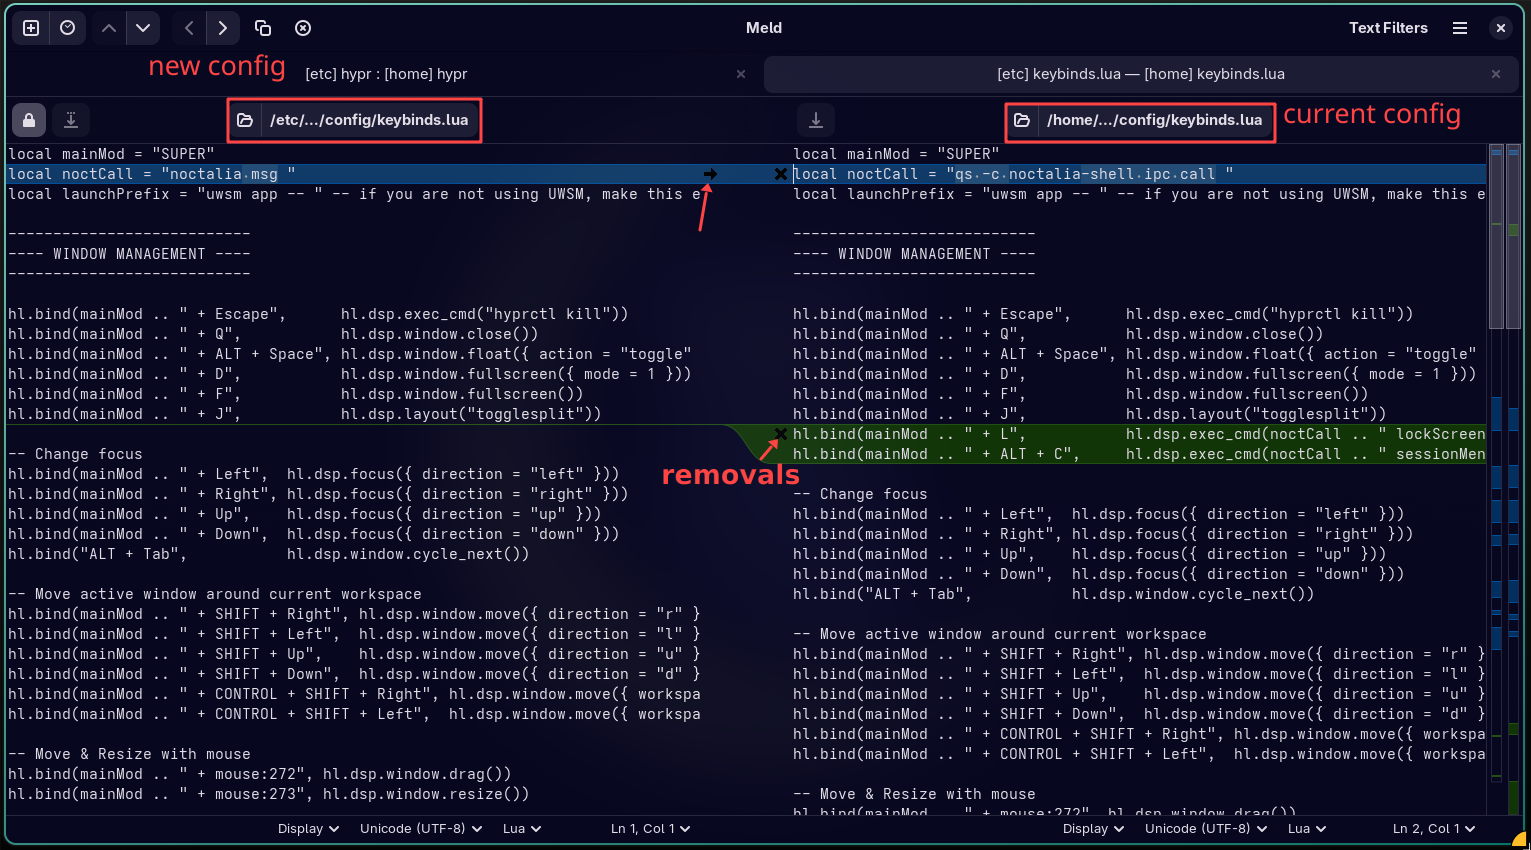
- Click into a blue file to see changes to be applied. You can use your best judgement to determine what to apply, but if you haven’t made any changes, it’s safe to overwrite the whole file. Click the arrow to apply changes and the x to remove old lines.
- You can merge all as well.
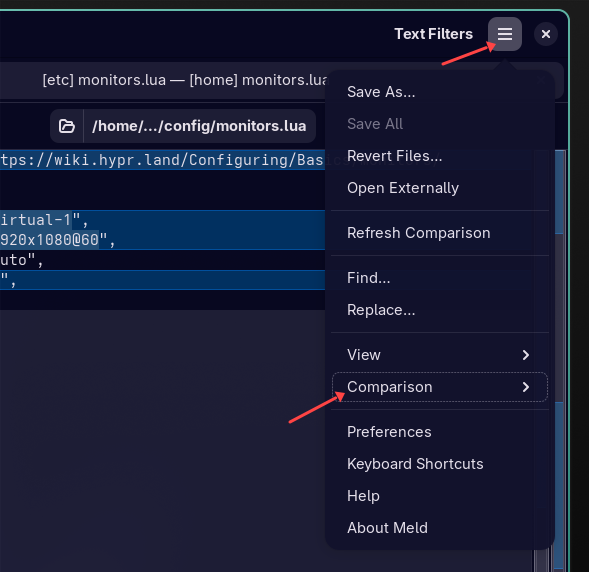
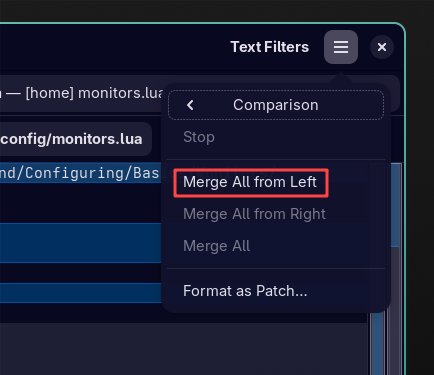
- When you’re finished with your changes for the file, save and exit.
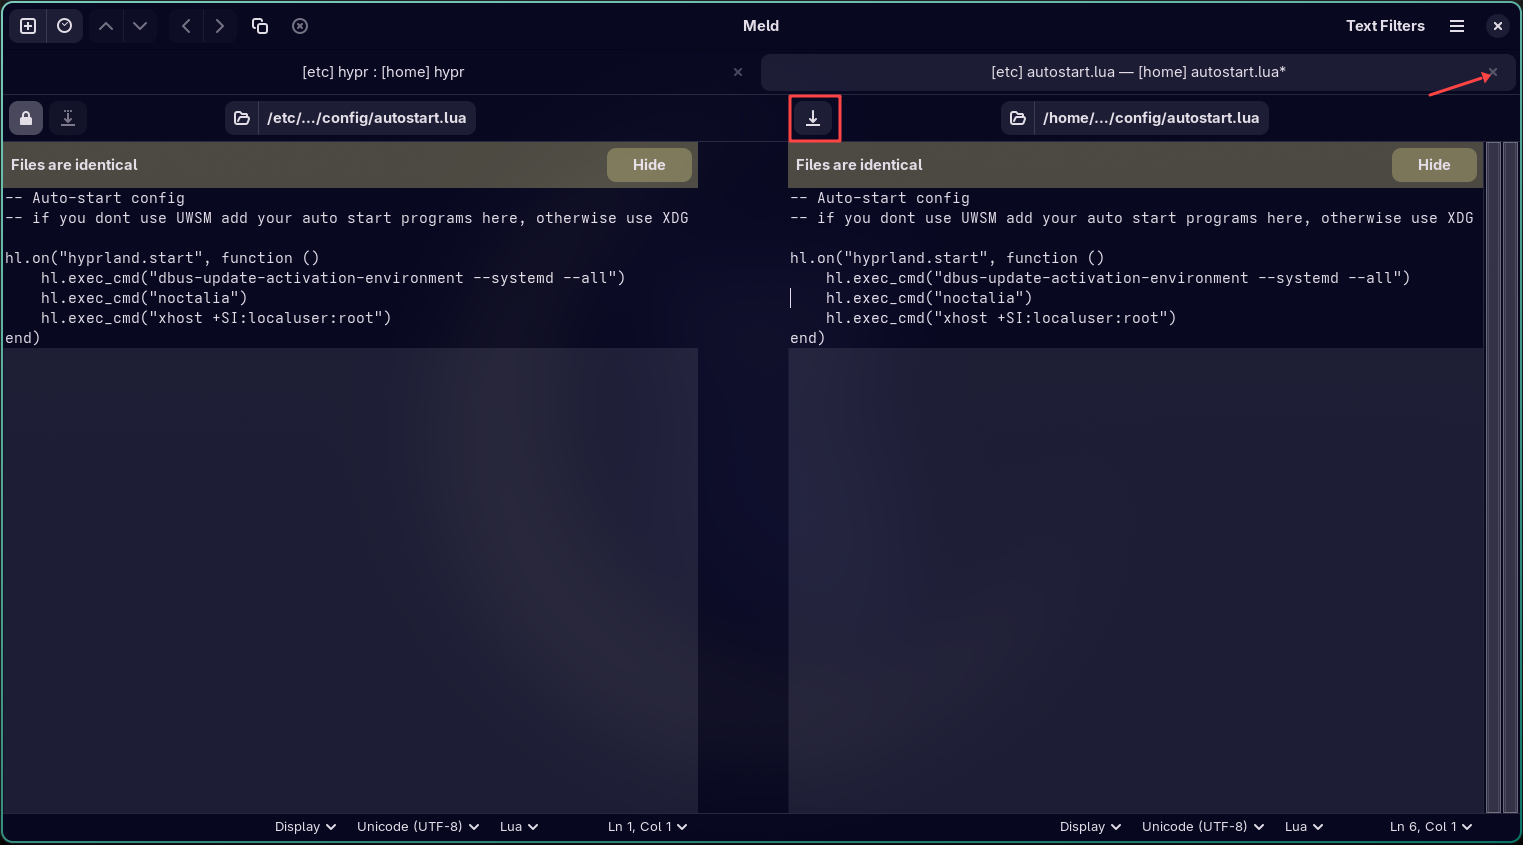
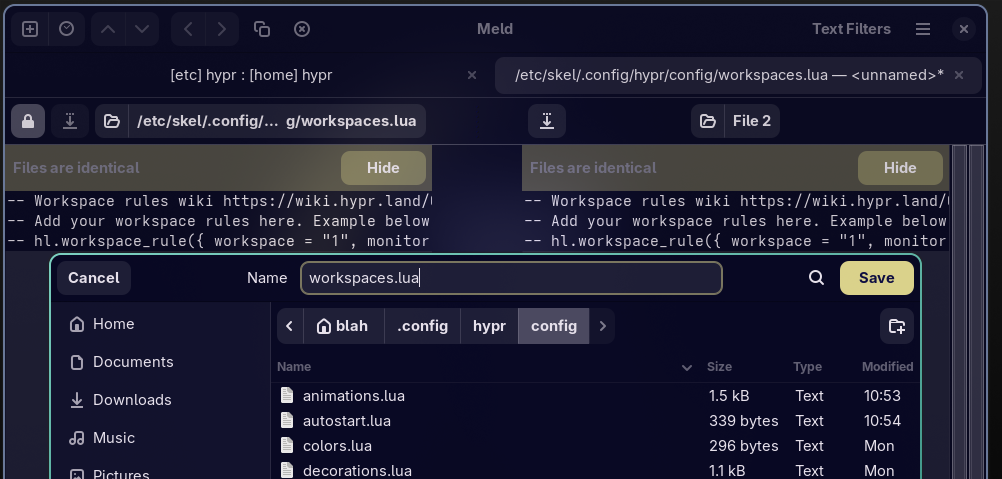
- The net new green files will ask where you want to save it. You can save it in
~/.config/hypr/config/with the same name. There are 4 new files.- defaults.lua is now variables.lua. You must manually move any custom additions/changes to the new file.
- keybinds.lua is now binds.lua. You must manually move any custom additions/changes to the new file.
- input.lua is now inputs.lua. You must manually move any custom additions/changes to the new file.
- workspaces.lua is new net and can be cleanly moved over without changes.
Noctalia Updates
Section titled “Noctalia Updates”- Run
rm -rf ~/.config/noctaliato remove the current configurations. Alternatively, move them somewhere else if you think you may need something there. cp -r /etc/skel/.config/noctalia ~/.configwill copy the new configuration into your home folder.
Other Updates
Section titled “Other Updates”Other files may have updates, you can use meld to integrate these. See the full release change log to see what else may have changed.
Removing orphans (v4->v5 migration)
Section titled “Removing orphans (v4->v5 migration)”After updating the package, old dependencies will be orphaned, you can remove those by running shelly purify -o.
Reboot
Section titled “Reboot”Rebooting should make the changes take effect. If the shell fails to load, try rebooting once more.