Gaming with CachyOS Guide
Welcome to the guide for gaming on CachyOS! This will guide you through everything you need to know to set up your system for gaming.
First of all, understand that getting a double-digit improvement in FPS is not always possible. Sometimes, optimizations can lead to minor improvements or even none at all, depending on the game and hardware configuration.
You can’t expect software optimizations to act like a free hardware upgrade.

Prerequisites
Section titled “Prerequisites”Essential Packages
Section titled “Essential Packages”To make setting up CachyOS for gaming easier, all the necessary gaming packages are grouped into one meta-package that includes all the necessary dependencies and libraries for gaming in Linux, along with a separate meta-package for popular tools and stores/launchers.
If you find that any packages are missing, feel free to let the CachyOS team know.
Follow the steps below to start with the gaming setup.
- Open CachyOS Hello. Go to Apps/Tweaks and click on
Install Gaming packages.

CachyOS Hello installs both cachyos-gaming-meta and cachyos-gaming-applications.
The cachyos-gaming-meta meta-package includes many gaming-related libraries.
sudo pacman -S cachyos-gaming-metaThe cachyos-gaming-applications meta-package includes the following:
- Tools
- Gamescope, GOverlay, MangoHud
- Launchers
- Steam, Heroic Games Launcher, Lutris, Faugus Launcher
sudo pacman -S cachyos-gaming-applicationsProton-CachyOS
Section titled “Proton-CachyOS”Proton-CachyOS is based on Proton’s bleeding-edge branch and applies a number of modifications on top of it.
- Wine-staging patches
- Wine Fullscreen FSR
- Includes video and audio codecs for game cutscenes
- Support for umu-launcher including UMU-Protonfixes
- Adds early hotfixes/workarounds for games
How to Properly Set Multiple Launch Options
Section titled “How to Properly Set Multiple Launch Options”The launch options in Steam are constructed using the following pattern.
[env variables] [wrappers] %command% [application arguments]-
[env variables]: These are options in the formVARIABLE=valueExamples PROTON_DXVK_D3D8=1# OrDXVK_HUD="fps,memory,version,api" -
[wrappers]: These are applications and scripts that modify how the real application is run. Arguments to the wrapper usually go after the wrapper’s executable.Examples mangohud --dlsym# Orgamescope -W 1680 -H 1050 -w 1280 -h 720 -S fit -F fsr --mangoapp -- -
%command%: This is the real application. This should be specified exactly as is and Steam will replace it with the proper command when the application is run. -
[application arguments]: These are various arguments to the real application, and they depend on the application.Example %command% -dx11
Example of a complete launch option combining all the elements:
__GL_SHADER_DISK_CACHE_SKIP_CLEANUP=1 prime-run game-performance %command% -dx11Environment Variables
Section titled “Environment Variables”- DLSS and Nvidia Features
PROTON_DLSS_UPGRADE=1: Automatically upgrade DLSS to the latest version.PROTON_DLSS_INDICATOR=1: Show DLSS status indicator in-game.PROTON_NVIDIA_LIBS=1: Enable Nvidia libraries (PhysX, CUDA) - not needed for DLSS/ray tracing.
Advanced Nvidia Controls
PROTON_NVIDIA_NVCUDA=1: Enable only CUDA support.PROTON_NVIDIA_NVENC=1: Enable only NVENC encoding.PROTON_NVIDIA_NVML=1: Enable NVML monitoring.PROTON_NVIDIA_NVOPTIX=1: Enable OptiX ray tracing.PROTON_NVIDIA_LIBS_NO_32BIT=1: Restrict libraries to only 64-bit (fixes RTX 4000+ performance issues).
- AMD & Intel Upscaling
PROTON_FSR4_UPGRADE=1: Automatically upgrade FSR to the latest version.PROTON_FSR4_RDNA3_UPGRADE=1: Use a RDNA3-optimized FSR4 DLL.PROTON_XESS_UPGRADE=1: Automatically upgrade XeSS to the latest version.
-
Wayland & Display
PROTON_ENABLE_WAYLAND=1: Enable native Wayland support.- Benefits: Allows HDR without Gamescope; improves latency/frame pacing
- Caveats: Breaks Steam Overlay and Steam Input, currently experimental. For more information visit Proton wayland quirks
PROTON_NO_WM_DECORATION=1: Disable window manager decorations.- Fixes: Borderless fullscreen issues, mouse clicking through windows
-
HDR Support
DXVK_HDR=1: Enable HDR output support.- Requirements: Gamescope with
--hdr-enabledORPROTON_ENABLE_WAYLAND=1
- Requirements: Gamescope with
- Users of NVIDIA drivers before 595.58.03 will also need to install
vk-hdr-layer-kwin6-gitwithpacman -S vk-hdr-layer-kwin6-gitand setENABLE_HDR_WSI=1
-
CPU & Sync Performance
PROTON_NO_NTSYNC=1: Use FSync instead of NTSync.- Benefit: Possibility of fixing issues in certain games that do not pair well with NTSync.
-
Shader & Cache Management
PROTON_LOCAL_SHADER_CACHE=1: Enable per-game shader cache, similar to Steam’s “Shader Pre-Caching”.- Note: This does NOT compile shaders ahead-of-time, it ONLY isolates the shader cache of each game. Shaders will still be compiled during gameplay.
PROTON_ENABLE_MEDIACONV=1: Enable Proton Media Converter.- Note: Testing purposes only
-
AMD Anti-Lag
ENABLE_LAYER_MESA_ANTI_LAG=1: Enable AMD Anti-Lag for reduced input latency.
- Controller & Input
PROTON_PREFER_SDL=1: Workaround for controller detection issuesPROTON_NO_STEAMINPUT=1: Disable Steam Input support.- Fixes: Wayland controller/gamepad issues
Setting Up Proton-CachyOS with Lutris and Heroic
Section titled “Setting Up Proton-CachyOS with Lutris and Heroic”Make sure you have umu-launcher from CachyOS installed in your system. Install it with the following command.
sudo pacman -S cachyos/umu-launcher- In the main Lutris screen, click the cogwheel icon next to Wine.
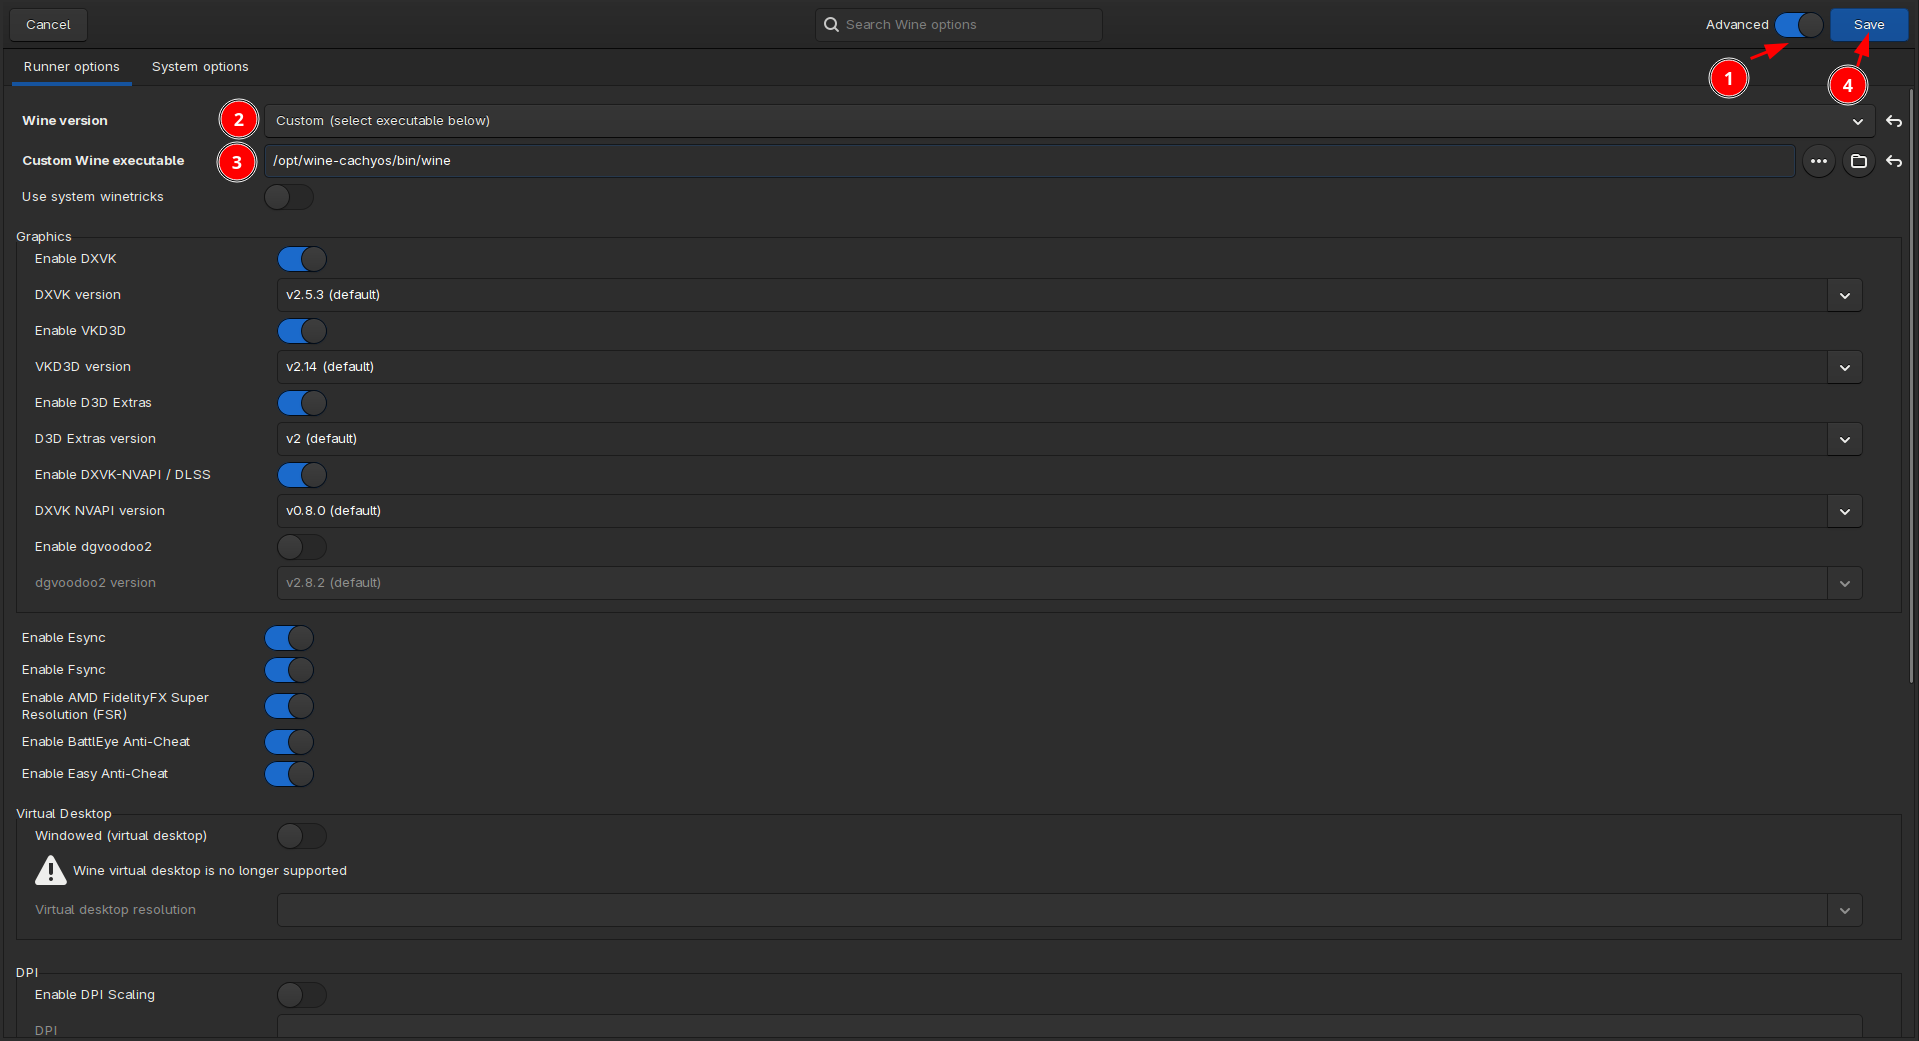
- Go to the Runner Options tab and confirm that your settings match the following:
- Wine version =
proton-cachyos-slrorproton-cachyos-native - Use System winetricks = Disabled
- Graphics
- Enable DXVK =
Enabled- Note: User-defined versions of DXVK, VKD3D, and DXVK-NVAPI are not applied when using
umu-launcher.
- Note: User-defined versions of DXVK, VKD3D, and DXVK-NVAPI are not applied when using
- Wine version =
- Navigate to the System Options tab.
- Lutris
- Disable Lutris Runtime =
Enabled - Prefer system libraries =
Enabled
- Continue scrolling down to the Game execution section and locate the Environment variables table.
- Add the following environment variables:
- Key:
PROTON_VERBoptional - Value:
waitforexitandrun- This allows protonfixes to work with a corresponding GAMEID.
- Key:
- Click Save to apply the changes.
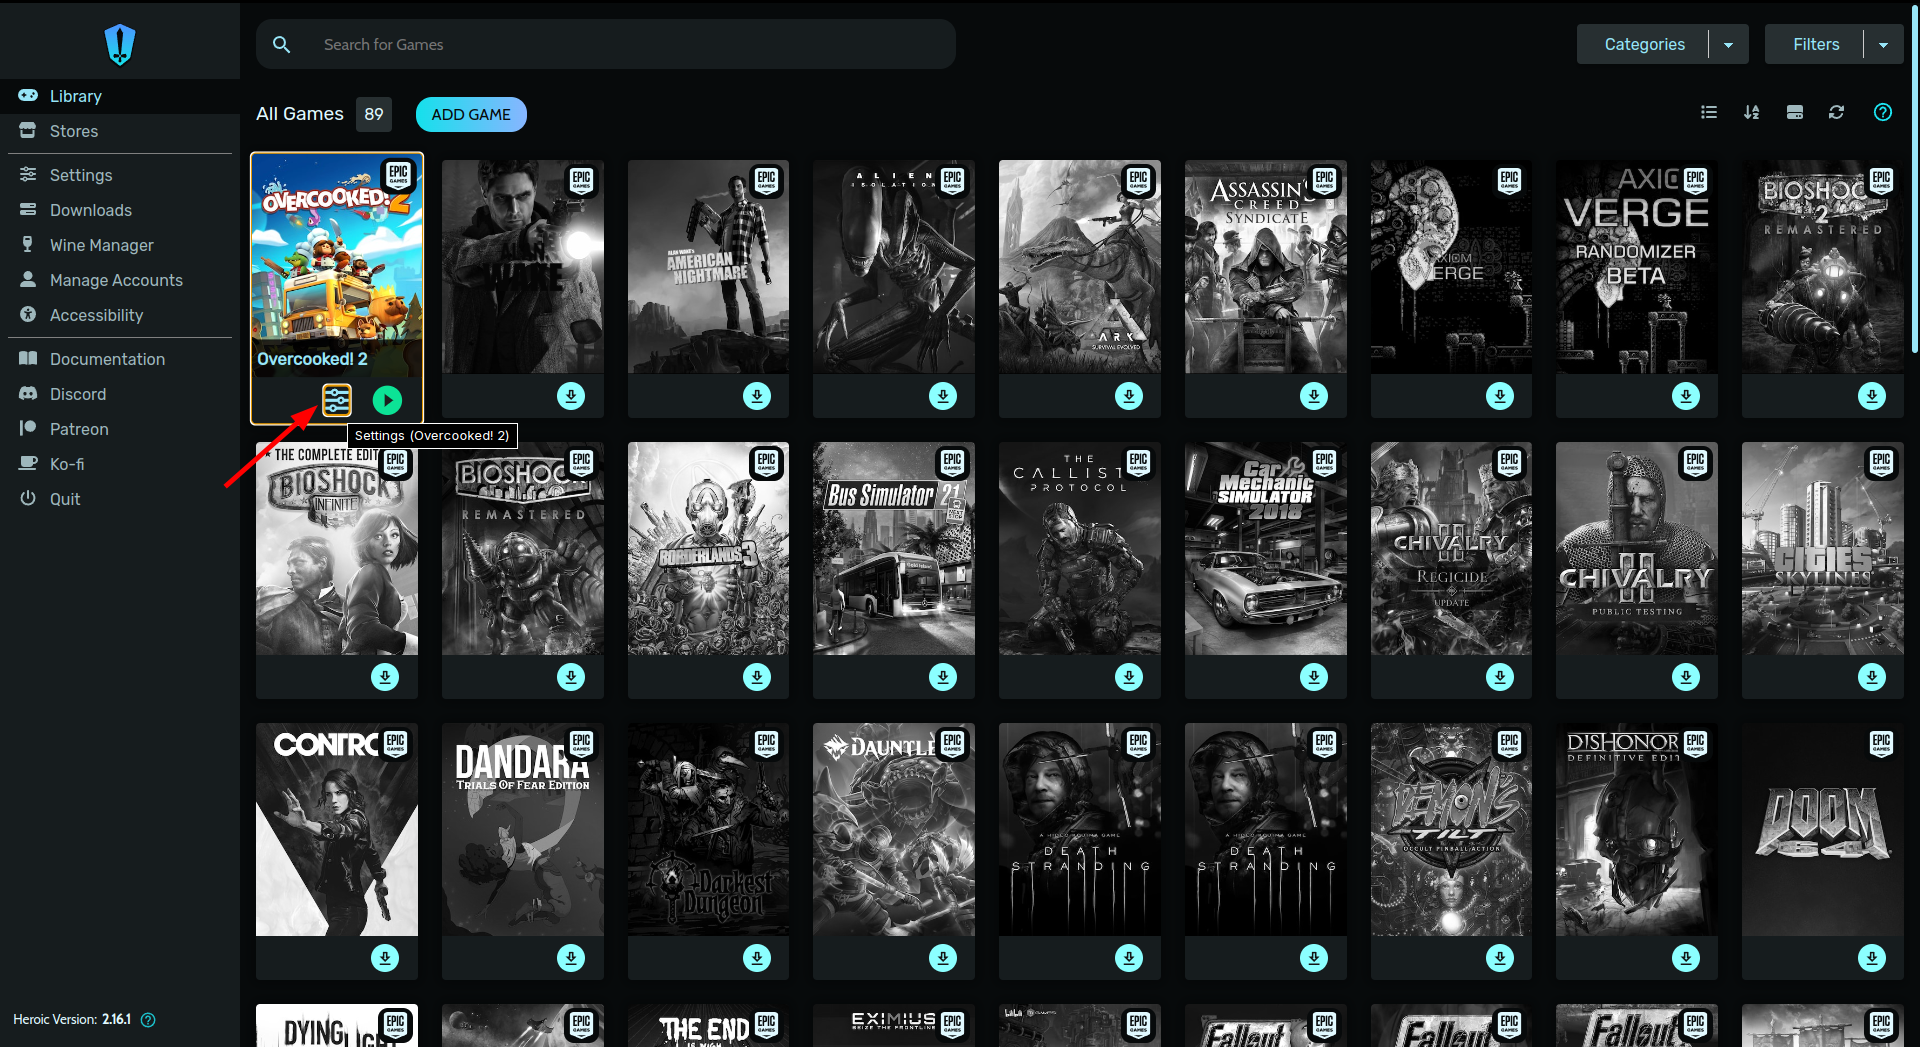
- Right-click the game you want to configure, then click on Configure.
- Go to the Runner Options tab and confirm that your settings match the following:
- Wine version =
proton-cachyos-slrorproton-cachyos-native - Use System winetricks = Disabled
- Graphics
- Enable DXVK =
Enabled- Note: User-defined versions of DXVK, VKD3D, and DXVK-NVAPI are not applied when using
umu-launcher.
- Note: User-defined versions of DXVK, VKD3D, and DXVK-NVAPI are not applied when using
- Wine version =
- Navigate to the System Options tab.
- Lutris
- Disable Lutris Runtime =
Enabled - Prefer system libraries =
Enabled
- Continue scrolling down to the Game execution section and locate the Environment variables table.
- Add the following environment variables:
- Key:
PROTON_VERBoptional - Value:
waitforexitandrun- This allows protonfixes to work with a corresponding GAMEID.
- Key:
- Click Save to apply the changes.
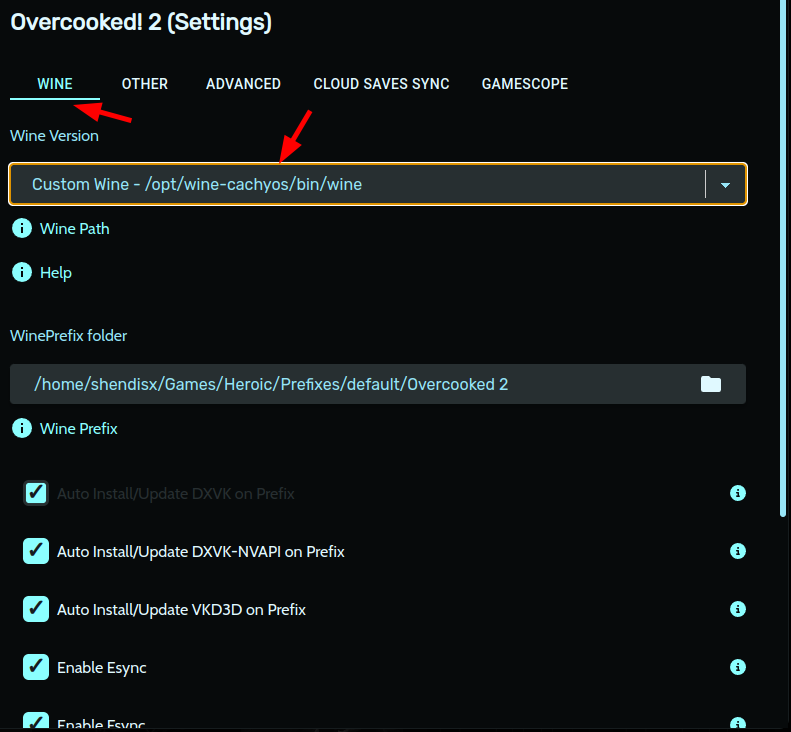
- Click on the
Configurebutton next to thePlay Nowbutton in the game you want to run. - In the
WINEtab. Set the Wine Version toProton - proton-cachyos-slr.
Anti-Cheat Support
Section titled “Anti-Cheat Support”How To Install proton-cachyos-slr
Section titled “How To Install proton-cachyos-slr”sudo pacman -S proton-cachyos-slr- Open a terminal and install
protonup.Terminal window sudo pacman -S protonup-qt - Open protonup-qt and follow the screenshot:

Choose the
x86-64_v3version if your CPU supports AVX2. Otherwise, download the one ending withx86-64. - Restart Steam if you had it opened.
Manual Installation (Advanced)
- Download the latest version here (scroll down to Assets).
Choose to download the one ending with
x86-64. It is the version most users should prefer. Choose the one that ends withx86-64_v3only if your CPU supports AVX2 and you want to experiment. - Decompress the file and move the folder to
~/.steam/steam/compatibilitytools.d/ - Restart Steam if you had it open.
Wine-CachyOS
Section titled “Wine-CachyOS”This is the same Wine that is at the core of Proton-CachyOS, but as a standalone package. It can be used in Lutris, Heroic, Bottles, and others. Keep in mind that it is not intended to be used for Steam.
- All the Wine modifications included with Proton-CachyOS
- Adds early hotfixes/workarounds for games
Additional configuration options
WINE_WMCLASS="[name]": Set theWM_CLASSof all Wine windows, allowing the window manager to control the Wine windows through rules.WINEUSERSANDBOX=1: Disable the creation of symlinks from Wine user folders (such as Documents and Pictures) to the equivalent folders in the user’sHOMEdirectory.WINE_NO_WM_DECORATION=1: Disable window decorations. It can fix issues with borderless fullscreen and the mouse clicking through the window.WINE_PREFER_SDL_INPUT=1: Workaround for controller detection issues
How To Use wine-cachyos-opt
Section titled “How To Use wine-cachyos-opt”Normally, running /opt/wine-cachyos/bin/wine instead of just wine should be enough for an application to run using wine-cachyos-opt.
If a more strict configuration is required, it could look like this:
export PATH="/opt/wine-cachyos/bin/:$PATH"export WINEDLLPATH="/opt/wine-cachyos/lib/wine:/opt/wine-cachyos/lib32/wine:$WINEDLLPATH"export LD_LIBRARY_PATH="/opt/wine-cachyos/lib/:/opt/wine-cachyos/lib32/:$LD_LIBRARY_PATH"If you want to use winetricks with wine-cachyos-opt, you can invoke it like this:
WINE=/opt/wine-cachyos/bin/wine WINEPREFIX=[your prefix] winetricks [verb]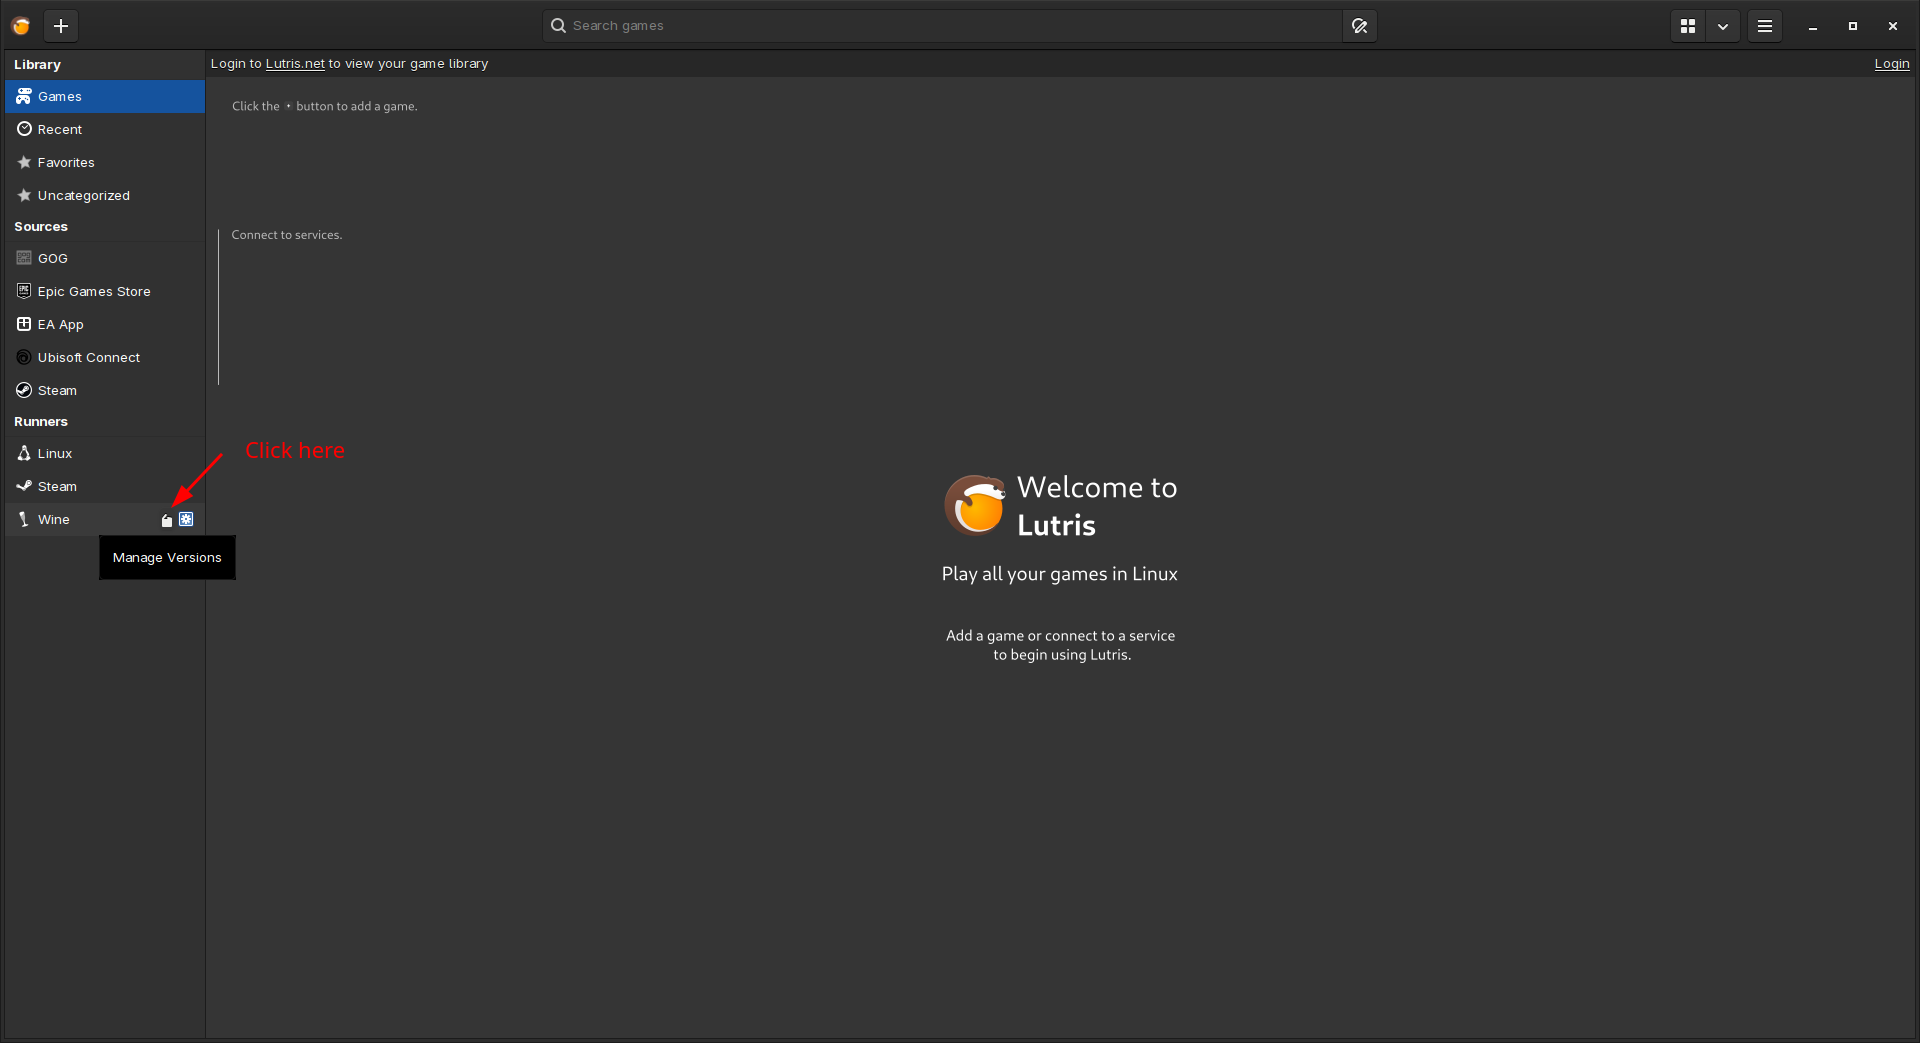
Steam FAQ & Tips
Section titled “Steam FAQ & Tips”How to set custom Proton versions in Steam
Section titled “How to set custom Proton versions in Steam”-
To set a custom Proton for a specific game, navigate to Library, right-click the game go into Properties > Compatibility, check
Force the use of a specific Steam Play compatibility toolcheckbox and select your desired proton version. -
To set Valve’s Proton as the global default, navigate to Settings > Compatibility > Default Compatibility tool and set the latest stable release of Valve’s proton or Proton Experimental.
Which Proton Version Should I Use in Steam?
Section titled “Which Proton Version Should I Use in Steam?”Proton 11.0is the stable release fromValve. Use this if the game you want to play is known to work well with it.Proton Experimentalis the bleeding edge release fromValve. Use this if the game you want to play is relatively new, doesn’t work well with the current Proton stable release, or if people recommend it on ProtonDB.
Proton-CachyOSis the one built and maintained by CachyOS. Using it overProton Experimentalis recommended only if you want the extra quality-of-life features and fixes. You can find two flavors in the CachyOS repositories: proton-cachyos-native and proton-cachyos-slr. We suggest using theproton-cachyos-slrpackage over theproton-cachyos-nativeone.Proton-EMis a development oriented custom build made by Etaash-mathamsetty. It is a very good option if you want to usewinewaylandandFSR4without any of the extrasProton-CachyOSoffers. It is also the source of various improvements thatProton-CachyOSalso includes. If you are interested in the latest and greatest inwinewaylanddevelopment, this is for you.dwprotonis a custom build made by Dawn Winery, it is a fork ofProton-CachyOSwith extra fixes and patches for certain anime games. If you encounter issues with such games with other Proton flavors,dwprotonis your best option.Proton-GEis a custom build made by GloriousEggroll. It includes various fixes, and can be useful to have in certain situations.Proton 9.0.4 or lowerare the stable releases fromValve. Use this if the game you want to play only works with a previous Proton release.
Fix H264 videos not playing or displaying color bars in games with Valve’s Proton
Section titled “Fix H264 videos not playing or displaying color bars in games with Valve’s Proton”Start Steam with the following command. Wait for it to load, then exit Steam and start it normally.
steam steam://unlockh264/Fix Stuttering Caused by the Steam Game Recorder Feature
Section titled “Fix Stuttering Caused by the Steam Game Recorder Feature”Add the following launch option to your game.
LD_PRELOAD="" %command%Capturing and Sharing Proton Logs
Section titled “Capturing and Sharing Proton Logs”To enable Proton logging for a game:
- Right-click your game in Steam and select Properties.
- Under Launch Options, set the
PROTON_LOGenvironment variable:This will create a log file in your home directory namedTerminal window PROTON_LOG=1 %command%steam-[AppID].log(for example, Counter Strike 2 uses AppID 730, so the file would besteam-730.log).
Custom Log Directory
To set a custom log directory, use PROTON_LOG_DIR:
PROTON_LOG=1 PROTON_LOG_DIR=/home/cachyos/steam-logs %command%Pre-caching Shaders with Proton-CachyOS, -GE, and -EM
Section titled “Pre-caching Shaders with Proton-CachyOS, -GE, and -EM”To disable this feature in Steam
Section titled “To disable this feature in Steam”In Steam, click on Steam->Settings, go to Downloads, and uncheck these settings:
- Allow background processing of Vulkan shaders
- Enable Shader Pre-caching
Repurposing a Windows NTFS Game Partition
Section titled “Repurposing a Windows NTFS Game Partition”Lutris is a game launcher on CachyOS. With Lutris, you can easily manage your game runners, including Wine, Proton, and emulators.
- Launch games through Lutris simply by clicking the Play button.
- Add any game you want by clicking the + in the top-left corner.
- Set up a store in the Sources at the left panel and connecting your account. It will then proceed to install said store, and then you’ll be able to run games from within the store, just like you do on Windows.
- And more!
Game stores supported in Lutris:
How to Properly Set Multiple Launch Options and Environment Variables in Lutris
Section titled “How to Properly Set Multiple Launch Options and Environment Variables in Lutris”- Launch options such as
-dx11or-fullscreenshould be added in the Arguments field under the Game options tab using a space as a separator. - Command wrappers, for example
mangohud --dlsymorgame-performance, should be added in the Command prefix field under the System options tab using a space as a separator. - Environment variables such as
DXVK_HDR=1should be added in the Environment variables table under the System options tab using the+button to add a new entry.
How to Properly Generate Logs In Lutris
Section titled “How to Properly Generate Logs In Lutris”- Set Output debugging info to
Inherit from environment. - In Environment variables Add
PROTON_LOGwith the value1.
Performance & Misc Tips
Section titled “Performance & Misc Tips”Do Not Combine gamemode and ananicy-cpp
Section titled “Do Not Combine gamemode and ananicy-cpp”Due to gamemode and ananicy-cpp both trying to modify a process niceness at the same time, it can lead to conflicts and unexpected behavior. If you want to use gamemode, it’s recommended to disable or stop ananicy-cpp first.
To stop ananicy-cpp, execute the following command:
systemctl stop ananicy-cppPower Profile Switching On-Demand
Section titled “Power Profile Switching On-Demand”CachyOS includes a wrapper script game-performance
which uses power-profiles-daemon to temporarily switch the power profile to performance.
The profile raises system power levels and sets the CPU governor to performance, and also switches any active scx scheduler to its gaming profile (if available).
When used to launch a game, the system remains in performance mode until the game exits, at which point the previous profile is restored.
Feral’s GameMode offers similar functionality.
How To Add game-performance to Steam, Lutris, and Heroic Games Launcher
Section titled “How To Add game-performance to Steam, Lutris, and Heroic Games Launcher”- Open your
Steam Library. - Right-click the game’s title and select
Properties. - On the
Generaltab you’ll the findLaunch Optionssection. - Add the following launch option:
Terminal window game-performance %command%
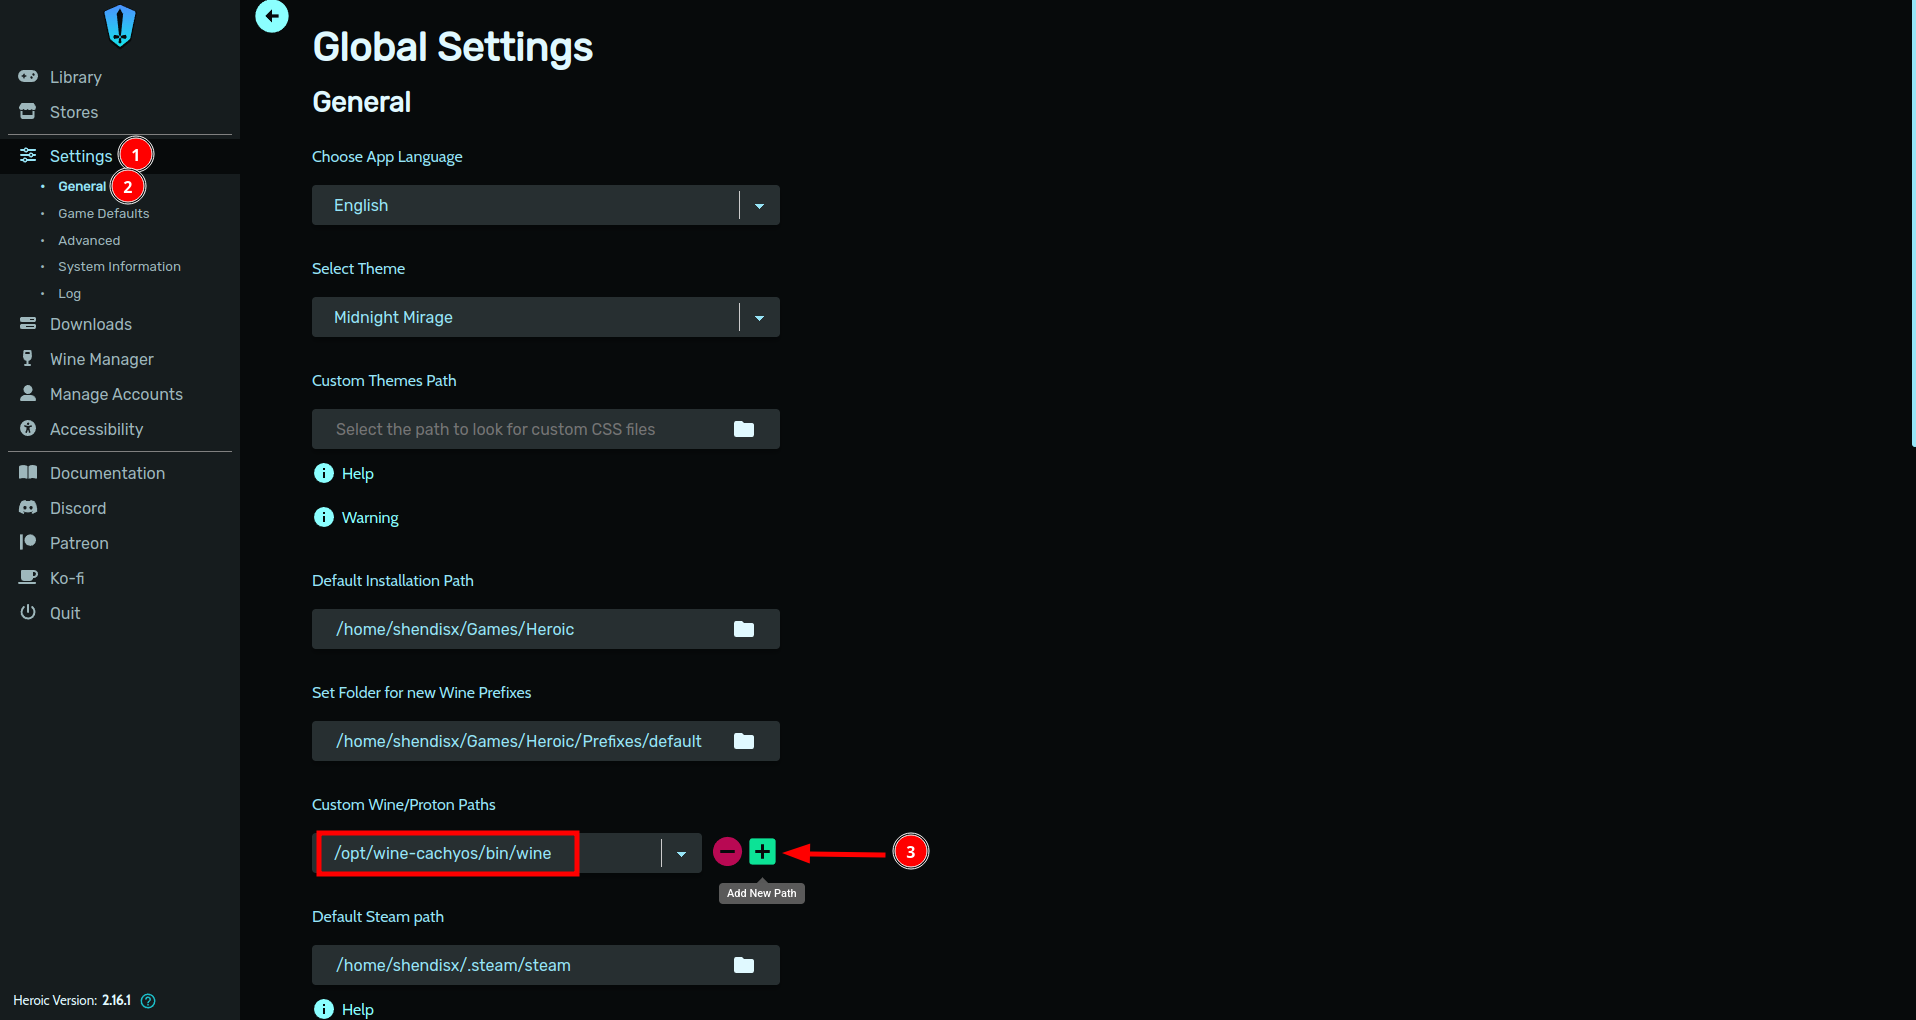
- On the left panel open
Settings. - Go to
Game defaultsthen click onAdvanced. - In the
wrappercommand section. Add the following line without any argument:Terminal window game-performance - Click on the
+sign to save changes.
- On the top right open the
hamburger menu. - Go to
Preferences/Global options. - Enable
Advanced Modeon the top right. - Scroll down to
Command prefixand add the following line:Terminal window game-performance - Save changes.
Increase maximum shader cache size
Section titled “Increase maximum shader cache size”Game shaders are compiled automatically while playing, which may cause long loading times and stuttering the first time you encounter them. These shaders are stored on your system to be reused when needed.
However, there is a maximum limit to the shader cache’s file size, causing old shaders to be forgotten when exceeding the default size. This can be an issue since large games can have shaders over 1GB in size, causing them to re-compile shaders every launch.
To avoid long loading times and stuttering, we can increase the global shader cache size:
- Open a terminal.
- Create a
environment.ddirectory in your config folder if it doesn’t exist:Terminal window mkdir -p ~/.config/environment.d - Create a new configuration file:
Terminal window touch ~/.config/environment.d/gaming.conf - Open the file with Micro (a text editor).
And paste the following depending on your GPU vendor:
Terminal window micro ~/.config/environment.d/gaming.confAMD
Terminal window # Increase AMD's shader cache size to 12GBMESA_SHADER_CACHE_MAX_SIZE=12GNVIDIA
Terminal window # Increase Nvidia's shader cache size to 12GB__GL_SHADER_DISK_CACHE_SIZE=12000000000 - Save the file by pressing
CTRL+SandCTRL+Qto exit Micro. Restart your system.
After restarting, the maximum shader cache size should be permanently increased. Thanks to psygreg’s shader booster for helping this guide.
Forcing the Latest DLSS Preset
Section titled “Forcing the Latest DLSS Preset”How to add dlss-swapper to Steam, Lutris, and Heroic Games Launcher
Section titled “How to add dlss-swapper to Steam, Lutris, and Heroic Games Launcher”- Open your
Steam Library. - Right click the game’s title and select
Properties. - On the
Generaltab you’ll findLaunch Optionssection. - Add the following Launch Option:
Terminal window dlss-swapper %command%
- On the left panel open
Settings. - Go to
Game defaultsthen click onAdvanced. - In the
wrappercommand section. Add the following line without any argument:Terminal window dlss-swapper - Click on the
+sign to save changes.
- On the top right open the
hamburger menu. - Go to
Preferences/Global options. - Enable
Advanced Modeon the top right. - Scroll down to
Command prefixand add the following line:Terminal window dlss-swapper - Save changes.
Manual DLL Replacement Method
If dlss-swapper is not working or causing issues, try updating game’s DLSS implementation manually by replacing nvngx_dlss.dll with an up-to-date version and using the dlss-swapper-dll wrapper script instead.
Ray Tracing Support
Section titled “Ray Tracing Support”The Arch Wiki has already provides comprehensive instructions on how to enable ray tracing for various hardware platforms.
Performance Drop on Nvidia in DirectX12 Games
Section titled “Performance Drop on Nvidia in DirectX12 Games”Some users report that the issue is related to how Nvidia’s Linux drivers handle GPU scheduling—unlike on Windows, where proper scheduling is enforced. There’s been no official Nvidia statement on this matter yet. There is Currently no known workaround for this issue. Nvidia is supposedly working on a fix, but it’s not clear when it will be released.
It has nothing to do with CachyOS.
In some titles, the performance drop is less noticeable than in others. Check out this benchmark comparison video for reference.
Follow the Nvidia thread to learn more about this issue.